Amateur Radio Digital Communications
Imagine receiving radio text messages from exotic places around the world and then being able to reply using your own radio and computer. Amateur Radio Digital Communications lets you send and receive text messages from stations much further away than you can generally talk to. It is so good at picking up the weakest of radio signals that it can even be used to detect your own signals bouncing off the moon!
Introduction
Amateur Radio digital communication is quite different from voice communication, where two operators communicate by speaking to one another over the air using the Press To Talk (PTT) button on their microphones. With Amateur Radio digital communication there is the same back-and-forth, take-it-in-turns to transmit procedure, because Amateur Radio communications is generally on a single frequency and is limited to one station transmitting at a time. This is called "simplex" or "half duplex" communication. Where Amateur Radio digital communication is different is that the operators type to one another using their computer keyboards and monitors. Effectively they are sending each other text messages.
Digital communications with Amateur Radio equipment is possible by using a computer to replace the spoken audio signals with computer-generated audio tones. These tones can vary from simply being one tone which is either on or off through to multiple tones, which are frequency or phase-shifted over a wider bandwidth. Some say that Morse code was the original Amateur Radio Digital Mode. Although there is considerable HF Noise on the band, computers are much better than humans in detecting faint signals. Indeed, they can send and receive multiple copies of the same text to improve the resilience of the digital link. This, normally redundant text transmission, permits computers to perform Forward Error Detection and Correction.
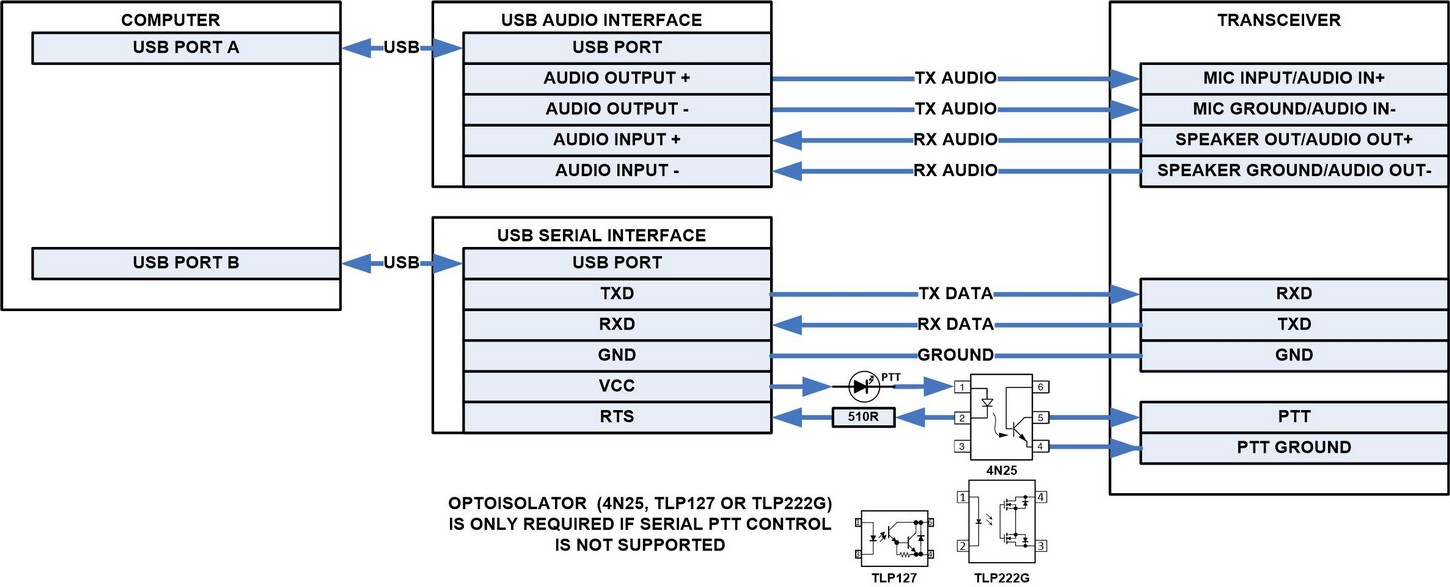
Normally an Amateur Radio transceiver uses a microphone, PTT switch and a speaker as a human interface for voice communication. For digital communication you will need a modern transceiver with a computer interface or an older-style transceiver with external devices and cables designed to connect it to a computer. Whichever way you do it, the computer interface must provide access to the radio's transmitter audio, receiver audio, PTT control and optionally frequency control. It is common to use the computer's USB port to accomplish all this as it is capable of transferring both audio and control signals. It could be as simple as connecting a single USB cable between the computer and a modern radio transceiver, through to the following setup need to use an older-style radio transceiver.
Preparation
The following information is fairly general in nature since an individual's station setup can vary.
Hardware
Prerequisites for this activity are: A working HF Amateur Radio station including a power supply, rig and antenna. A 40m band, half-wavelength, centre-fed dipole is shown below. It is fed with RG-178 coax and has a 1:1 coupling ferrite ring coupling transformer. It needs to be strung up at a height of at least a few metres. A basic rig like the Yaesu FT-818 or a Xiegu G90 will work, but you will need additional cables and adaptors for CAT (rig control) and RX/TX Audio interfaces. There are off-the-shelf interfaces available like SignaLink, RIGblaster and CE-19 or you can see our USB Rig Interface for ideas if you want to build your own. A modern rig like an ICOM IC7300 just requires a USB cable. You will also need a Personal Computer, running Windows, Linux or MacOS, that connects to the HF Transceiver via a USB cable.

Software
You will need to install the latest version of FLDIGI, a Fast Light DIGItal mode application on the PC. There are many digital modes to choose from. Ignoring the traditional RTTY FSK and BPSK modes, we will be using Olivia 8/250, a modern, robust, Multi-Frequency Shift Keying (MFSK) digital communications mode, using 8 tones in a 250Hz bandwidth, including Forward Error Detection and Correction.

While we recommend using FLDIGI to demonstrate digital communications in the first instance, there are numerous other digital mode applications that you will be able to use with the above setup. Some allow you to transmit images, files and even voice, as well as text over digital communications.
Other digital mode applications include: WSJT-X, JS8CALL, Winlink, MutiPSK, DigiPan, HRD, MMSSTV, QSSTV, EasyPal, EasyDRF, FreeDV, PC-ALE, ION2G, APRS
FLDIGI Configuration and Use
Start FLDIGI: After the installation a wizard normally starts helping you through the configuration process. However, as a minimum, you will need to configure the following items:Configure | Configure Dialog: Check out each item to familiarise yourself with the settings.Call: Enter your own station callsign and personal informationIDs: Select Notify only and Diable freq changeMisc | Sweet Spot: Set to 1500Rig Control | Hamlib: Use Hamlib. Rig. COM port/device.Soundcard |Devices: Capture (for RX) and Playback (for TX)
Settings, hints and tips to join our SARCNET Digital net:
Centre Frequency: 7072500 Hz (i.e. 7071000 Hz Dial frequency and 1500 Hz Cursor frequency)Alternate Centre Frequencies: 7072200 Hz and 7072800 Hz if the above channel is in use.Rig Mode: USBDigital Mode: Olivia 8/250Time: 0700-1300 UTCPower levels: Generally use low power (QRP), say less than 30W. Indeed, we have made 3000 km QSOs on 0.5W. Note that if you can see a station on the waterfall, or even hear it, it is using more power than is strictly necessary for a reliable Olivia QSO! Each station can call CQ regularly to see if others wish to join the net. All stations may like to increase power if a DX station is present on the net.Audio Levels: Adjust the audio levels using a combination of rig configuration and audio device properties. Increase the TX audio level to just below the pre-set rig TX output power level. Check that there is no ALC action on the rig. Set the RX audio level to achieve a salt-and-pepper display on the FLDIGI waterfall.Filters: If you have TX and RX filters use them! These provide an excellent improvement in RX SNR and TX adjacent channel interference. Use 300Hz bandwidth on both TX and RX.Squelch: Use the minimum FLDIGI squelch level necessary to avoid the display of random characters, or off for weak stations. Having the squelch set too high is the usual reason why you can't decode anything. It is easy to forget.IDs: Encode TxIDs decode RxIDs (turn RxID and TxID on) so newcomers can see what frequency and mode to use. However configure your software not allow RxIDs to automatically change your TX frequency.Spotting: Configure Misc/PSK reporter and turn spotting on (and click the spot button on the top menu bar). This will automatically send received callsigns to PSKreporter.Cursor: Do not change your cursor frequency to centre stations that are not quite on frequency. Use your rig's RIT. Keep your TX frequency constant.Messages: Short, single line sentences are easier to read. Avoid any unnecessary verbosity. In a group, no more than six (6) single line sentences per QSO will ensure that everyone gets a turn.Macros: Try not to use Macros. Except maybe ANS and KN. Macros are BORING and impersonal. Let your fingers do the talking. Press <CTRL-T> to transmit and <CTRL-R> to receive.QSOs: Double click on the other station's callsign and press the QRZ button to get the details. Provide callsigns at the start (use ANS) and end (use SK) of a QSO, and only every so often while in a QSO (use KN).Overs: When it is your turn to send: After the other station's final "Hee-Haw", press <CTRL-T>, press <Enter>, type in your sentences, press <Enter> <Enter> <CTRL-R>. Note: You can pre-fill the FLDIGI blue message window with text to send while you are receiving, but avoid any lengthy delay in starting your transmissions. At the end of your over send BTU or callsigns and KN.Text Cursor: FLDIGI only sends up to the text cursor in the blue message window. If you reposition it, or hide it by switching to a different app, FLDIGI will stop sending and just enter a "TX holding pattern".Backspace: With FLDIGI you can use backspace if you make a mistake!Signal Reports: RST and SNR reports are of little value. Report the percentage correctly received. E.G. "90% copy".Signing Off: Be brief: "73, GL".
Activity
- Using the text and links above prepare the students by revising the knowledge required.
- Allow the students to build the station hardware and install the station software.
- Test the setup and ensure that it is compliant with the licence conditions of the operator.
- Arrange for an on-air test with a local participating station. Contact us if you need our help with that.
- Arrange for a regular sked with a participating School Amateur Radio Club.
- Referring to on-line published lists of digital mode frequencies, e.g. Olivia Digital Mode on HF, fish around for other digital contacts, including DX contacts.
Homework
- Check out all the different HF digital modes on SIGIDWIKI. Use the waterfall images to identify FSK, MFSK and PSK type signals, the bandwidth and how many tones they may have.
- Tune around the HF Amateur Radio Bands to find digital mode signals. Compare the waterfall display shown on your rig or FLDIGI, or the sound of the signal to the SIGIDWIKI images and on-line recordings, to identify the type of digital mode. Use FLDIGI or another digital mode application to decode them.
- Checkout the weather fax station frequencies in your area here. Use FLDIGI WEFAX-IOC576 mode on strong signals to print weather charts.